M1 Mac を購入したものの、マルチモニタ環境に関して困った経験はありませんか?
実は、M1チップ搭載のMacは接続できるモニタの数に制限があり、Mac miniは最大2台、MacBookは1台しか外部モニタを接続できません。この制限に悩む方も多いはず。私もその一人でした。
しかし、この記事では、そんな悩みを解決するために、USBモニターを活用してM1 Macでトリプルディスプレイを実現する方法を紹介します。自宅にあるモニターやハブをうまく活用することで、M1 Macでも作業効率が大幅に向上します。
これからご紹介する方法を実践すれば、あなたもM1 Macで快適なマルチタスク環境を手に入れられるはずです!
—–
Setting up a multi-monitor environment on an M1 Mac can come with unexpected challenges. Many users struggle with the limitation on the number of external displays—M1 Mac mini supports only two, while MacBook models can connect to just one. This restriction may leave you wondering how to expand your workspace effectively. However, with some creative solutions, it is possible to go beyond this limit and achieve a triple-monitor setup. In this article, I’ll share my experience of setting up three screens on an M1 Mac mini. If you’re looking to boost your productivity and create a more efficient multi-display workspace on your M1 Mac, this guide is for you.
M1 Macでのマルチモニタ環境は以外と壁あり/ Challenges of Multi-Monitor Setup on M1 Mac
そんな事を全く知らずM1 Mac miniを買った当初は苦労しました・・・ご存知の方は多いと思いますが、M1のMacがモニタを接続できる数は
- Mac miniは2台
- Macbook系は1台
という制約があります。ようは、「M1 Macは2画面まで」ということです。
色々方法はあるみたいですが、この記事の方法でM1 Mac miniでトリプルディスプレイができます。
—–
Initially, when I bought the M1 Mac mini without knowing about this, I struggled. Many might be aware, but the number of monitors the M1 Mac can connect to is,
- Mac mini can connect to two monitors.
- Macbook models can connect to 1 monitor.
Exactly, the constraint is that M1 Macs, including the Mac mini, support connecting to a maximum of two external displays.
It seems there are various methods, and with the approach described in this article, it’s possible to achieve a three-screen setup with the M1 Mac mini.

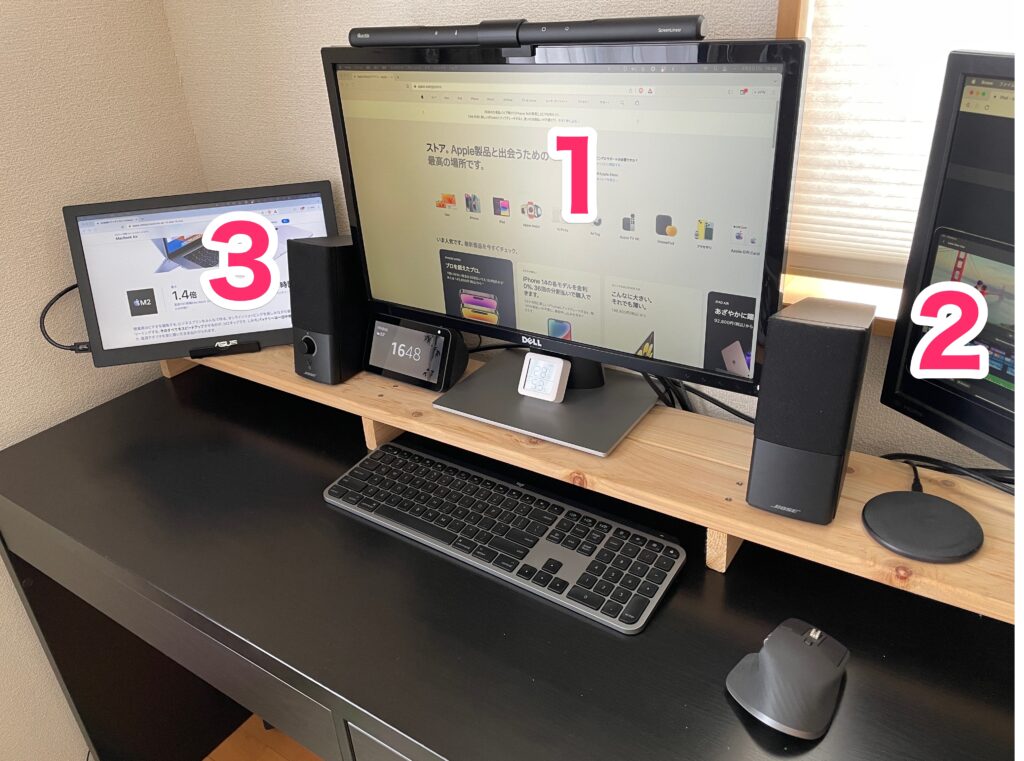
我が家ではUSBモニターでトリプルディスプレイ / Set up a three-monitor using USB monitors.
うちの場合は
- HDMI
- Type-C→DP変換
- USBモニター
で3画面にしています。なぜかUSBはモニターとして認識されるものの3つ目として使えます。
他には
- Display Linkを使う
- AirPlayを使う
方法があるようです。
我が家では家にあるものを活用したのでUSBモニターの方法を取ってます。
大出張時代に「どこでもデュアルモニタ」を実現するために買ったこの↓モニターを3つ目に使ってます。USB一本で電源も通信も出来るので見た目もスッキリです。WindowsでもMacでも使えます。なんと言っても安いし、専用のスタンド兼カバーもあって持ち運びもラクです。画質は今の時代ではちょっと劣りますが・・・
—–
In my case,
- HDMI
- Type-C→DP
- USB monitor
USB is recognized as a monitor, but I can use it as the third one.
In other case,
- Using Display Link
- Using AirPlay
At my home, I utilize what I have, so I’ve opted for the USB monitor method.
During the era of frequent business trips, I purchased the monitor below to achieve ‘dual monitors anywhere.’ Now, I use it as a third monitor. With just one USB connection, it handles both power and communication, providing a neat appearance. It works with both Windows and Mac, and it’s not only affordable but also convenient for portability, thanks to its dedicated stand and cover. While the display quality is slightly inferior by today’s standards…”

家で使う時はこれを使ってスタンドにしてます。iPadなどのタブレット用ですがモバイルモニターにも使えます。便利です!
—–
When using it at home, I utilize this as a stand. Although designed for tablets like the iPad, it can also serve as a mobile monitor. It’s quite convenient!

やっぱディスプレイが3つあると色々と作業がラクです。
- 1つはYouTubeで音楽垂れ流し、2つのディスプレイで参考にするサイト見ながら資料まとめなど
- 1つはParallelsでWindows作業、2つはMacで作業
など、やれることは無限ですね!
—–
Having three monitors really makes various tasks much easier.
- One is for streaming music on YouTube, while I use the other two monitors to browse reference sites and compile documents, among other tasks.
- One monitor is dedicated to Windows tasks using Parallels, while the other two are for working on the Mac.
Indeed, the possibilities are endless!
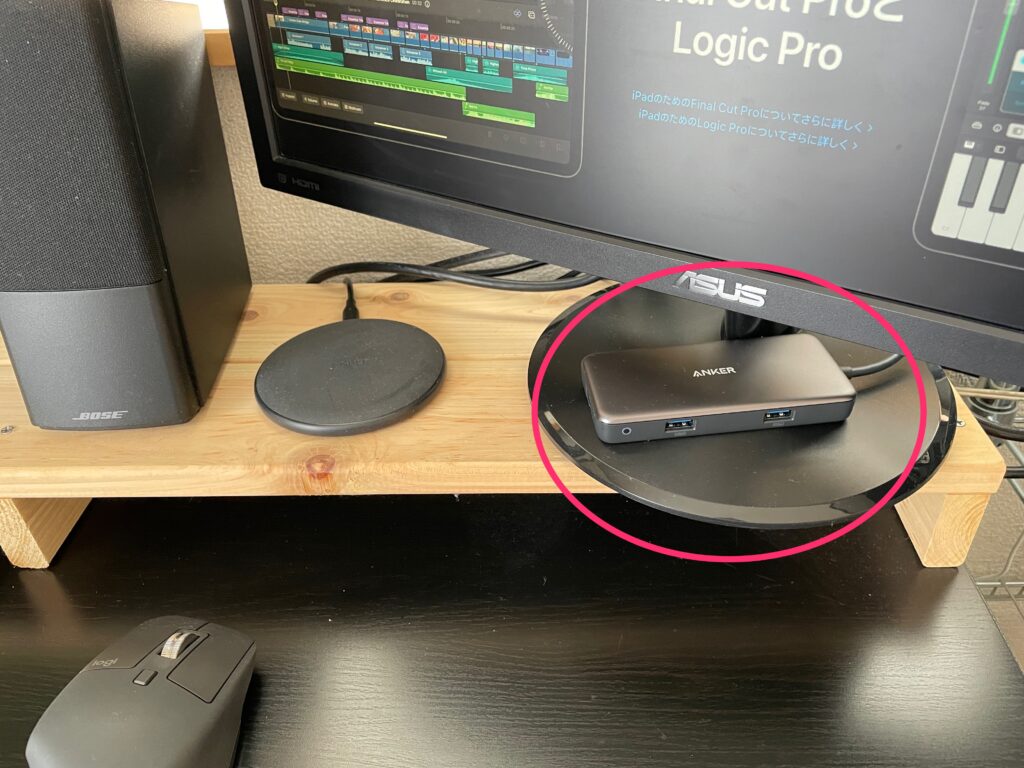
おまけ-Mac miniにはUSBハブを活用 /Extra-Using a USB hub ofr Mac mini
USBがモニターで埋められてしまうので(もう一つはストレージとしてSSDが有線接続されている)、Ankerのハブでとりあえずごまかしてます笑
—–
Since USB is occupied by the monitor (the other one is connected with a wired SSD for storage), I’m using an Anker hub to temporarily overcome the limitation. w

このハブがあれば
- USB x2
- カードリーダー
が増えるので、普段使いでは全く困りません。見た目がゴチャつくのだけが不満です。
—–
With this hub in place,
- USB x2
- Card reader
The available ports increase, so I have no issues with everyday use. The only drawback is the cluttered appearance.


コメント